6 mins
OpenImage formats explained: When to use different image file types

by Amelya Cliff
5 mins
We get a lot of questions about image quality at Go Up. Nobody wants pixelated images on their shiny new website, but image resolution can be a minefield for the unversed. We’ve put together this handy guide to help you perfect your pixels and decipher dpi.
by Amelya Cliff
19th July 2021
Image resolution relies on the number of pixels (or dots) per inch and is measured with the abbreviated PPI/DPI.
Is there anything worse than creating a beautiful graphic, only for it to be pixelated on your website? Those dreaded little squares are every web connoisseur’s nightmare, but they needn’t be. Avoiding them is pretty simple if you know what you’re doing — and that’s what we’re here to help you with. Welcome to our guide to image resolution.
Image resolution relies on the number of pixels (or dots) per inch and is measured with the abbreviated PPI/DPI. The concept is intuitive. Every image is made up of dots that form the bigger picture, and DPI quantifies how many of these pixels exist in every inch of the image. So, if an image has a resolution of 30dpi, it has 30 pixels squeezed into every inch of it. What this means is that the higher the DPI, the smaller the dots are. Hence, they’re less visible to the naked eye and, in turn, produce better quality visuals.
We just said that higher DPI equals better-looking pictures. Well, this comes with a big caveat. Sometimes greater resolution results in poorer quality. We know, it sounds confusing, but let us clarify. Your image doesn’t just float around aimlessly in the air, viewed in a vacuum — it is presented on hardware. This modern-day canvas has certain capabilities, a specific number of pixels it can show, which is not fluid.
It’s always recommended to choose a picture with the highest DPI and then adjust it to your needs.
Bearing that in mind, let’s say you try to view a 300dpi picture on your monitor. As we’ve already established, that means there are 300 pixels in every inch of this visual. Unfortunately, PC monitor resolution usually ranges from 67 to 130dpi, which is three to four times less than your image. You can already see where this is going — your screen is not built to display that quality of a graphic. However, the number of pixels is fixed, so instead of reducing them, it will stretch the image out so that all the pixels are showing. This makes each dot much larger, which churns a poor-quality picture. Completely counterproductive.
However, it’s always recommended to choose a picture with the highest DPI and then adjust it to your needs. The fact that the number of pixels is fixed sometimes poses the opposite problem. If you have an image that has a very low DPI, and you want to increase it, you can’t just add more dots out of nowhere. After all, you can’t create something from nothing (unless you artificially add them in using a process called interpolation, which we will not get into). So, improving your resolution can only be done by making the image size smaller, keeping the same number of pixels but fitting more of them in an inch.
That’s why image resolution is so important to designers — if you want to give your customer a fantastic user experience, you must take into account all the factors that go into choosing the appropriate image resolution. There’s not much point in creating beautiful materials if they’re going to be downgraded by your end-user’s screens. This is without mentioning the fact that a high-quality image means a larger file size, which results in longer loading times, impacting user experience and downgrading the page in the eyes of search engines — for example, Google prefers images to be under 100KB.
Finding the correct image resolution for your visuals might sound a little complicated, but it doesn’t have to be. Generally speaking, there are a few rules of thumb.
It’s always recommended to choose a picture with the highest DPI and then adjust to your needs.
When printing an image, such as in a magazine or poster, there are fewer restrictions when it comes to maximum DPI. However, a low resolution picture will look far worse printed than on a screen. If you use a home printer, this matters less, because those printers are usually of lower quality. But if you take your picture to a proper printing service, you’re likely to see every single pixel on your page.
For a good quality print, it is recommended to opt for a DPI of 300, although some printers may require images of up to 600dpi, so it’s advised to contact your shop to enquire about this. You may be able to get away with a lower resolution if you’re printing images of a certain size — for example, in some cases, an A3 print will be fine with 150dpi — but you should always strive for 300. Another relevant point is that you shouldn’t enlarge the size of your graphic by too much when printing. It is discouraged to try and augment an image by more than 115%, even if it’s 300dpi.
Digital viewing requires an appropriate balance between the file size, display potential and visual quality.
Digital viewing requires an appropriate balance between the file size, display potential, and visual quality. You want a resolution that is suitable for every screen without weighing your user’s equipment down, while still looking detailed.
The recommended image resolution for the web is 72dpi, seeing as almost all monitors can display this without going too low and losing visual quality. Going over this won’t only present a worse-looking image, it will also be bad for SEO, as high DPI also means a larger file size, and as such, longer loading time. You can use plugins that optimise and compress image size without harming the quality too much, such as WP Smush (if the CMS you’re using is WordPress). Another factor that will affect your image quality is the format in which you save your files — JPEG and WebP are recommended, as their size is usually smaller than other picture formats such as PNG or GIF.
Another factor that will affect your image quality is the format in which you save your files — JPEG and WebP are recommended, as their size is usually smaller than other picture formats such as PNG or GIF.
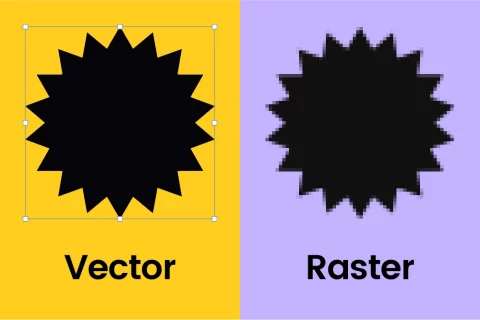
Most of us are familiar with files such as JPG, PNG or TIFF. These are all graphic format types that are made up of pixels, also known as raster graphics or bitmap. But have you ever heard of EPS or SVG? They’re types of visual files that don’t rely on pixels at all, but on mathematical equations (we know, it’s really cool). These images, known as vectors, are not bound by sizes or resolution. In other words, they are infinitely scalable, which is particularly useful for logos, symbols, icons and other design elements that would need constant resizing.
Now, you must be thinking, why would anyone use bitmap over vector graphics? The answer is that in a lot of ways, vectors cannot compete with the vivid nature of raster graphics. They’re not as realistic, as they have limited colour shading and depth variation. Vector files are also less easily manipulated, so you can’t imprint filters or special effects onto them in the same manner. And finally, they cost more to produce. They can be extremely useful for some outcomes, such as logos and less-detailed graphics, but insufficient for realistic images.
More like this
6 mins
OpenImage formats explained: When to use different image file types
by Amelya Cliff
8 mins
OpenHow to ensure your web design is accessible for all

by Laura Heffernan

5 mins
OpenHow To Talk To Your Web Designer To Get Better Results

by Cecilia Redondo-Zaratiegui